Capability Management
Capabilities are standardized packages of common workflows and operating methods in bit-Agent, similar to tools or shortcuts. Each capability represents a solidified end-to-end operation flow that can achieve a specific business goal, such as generate a daily report automatically, download statements in batch, or enter system data in bulk.
Capabilities can currently be created through exploration. See From Exploration to Capability. You can also create them directly from scratch.
Edit a Capability
Capabilities can be edited. Built-in capabilities cannot be edited, while exploration-generated capabilities can.
The main parts of a capability are:
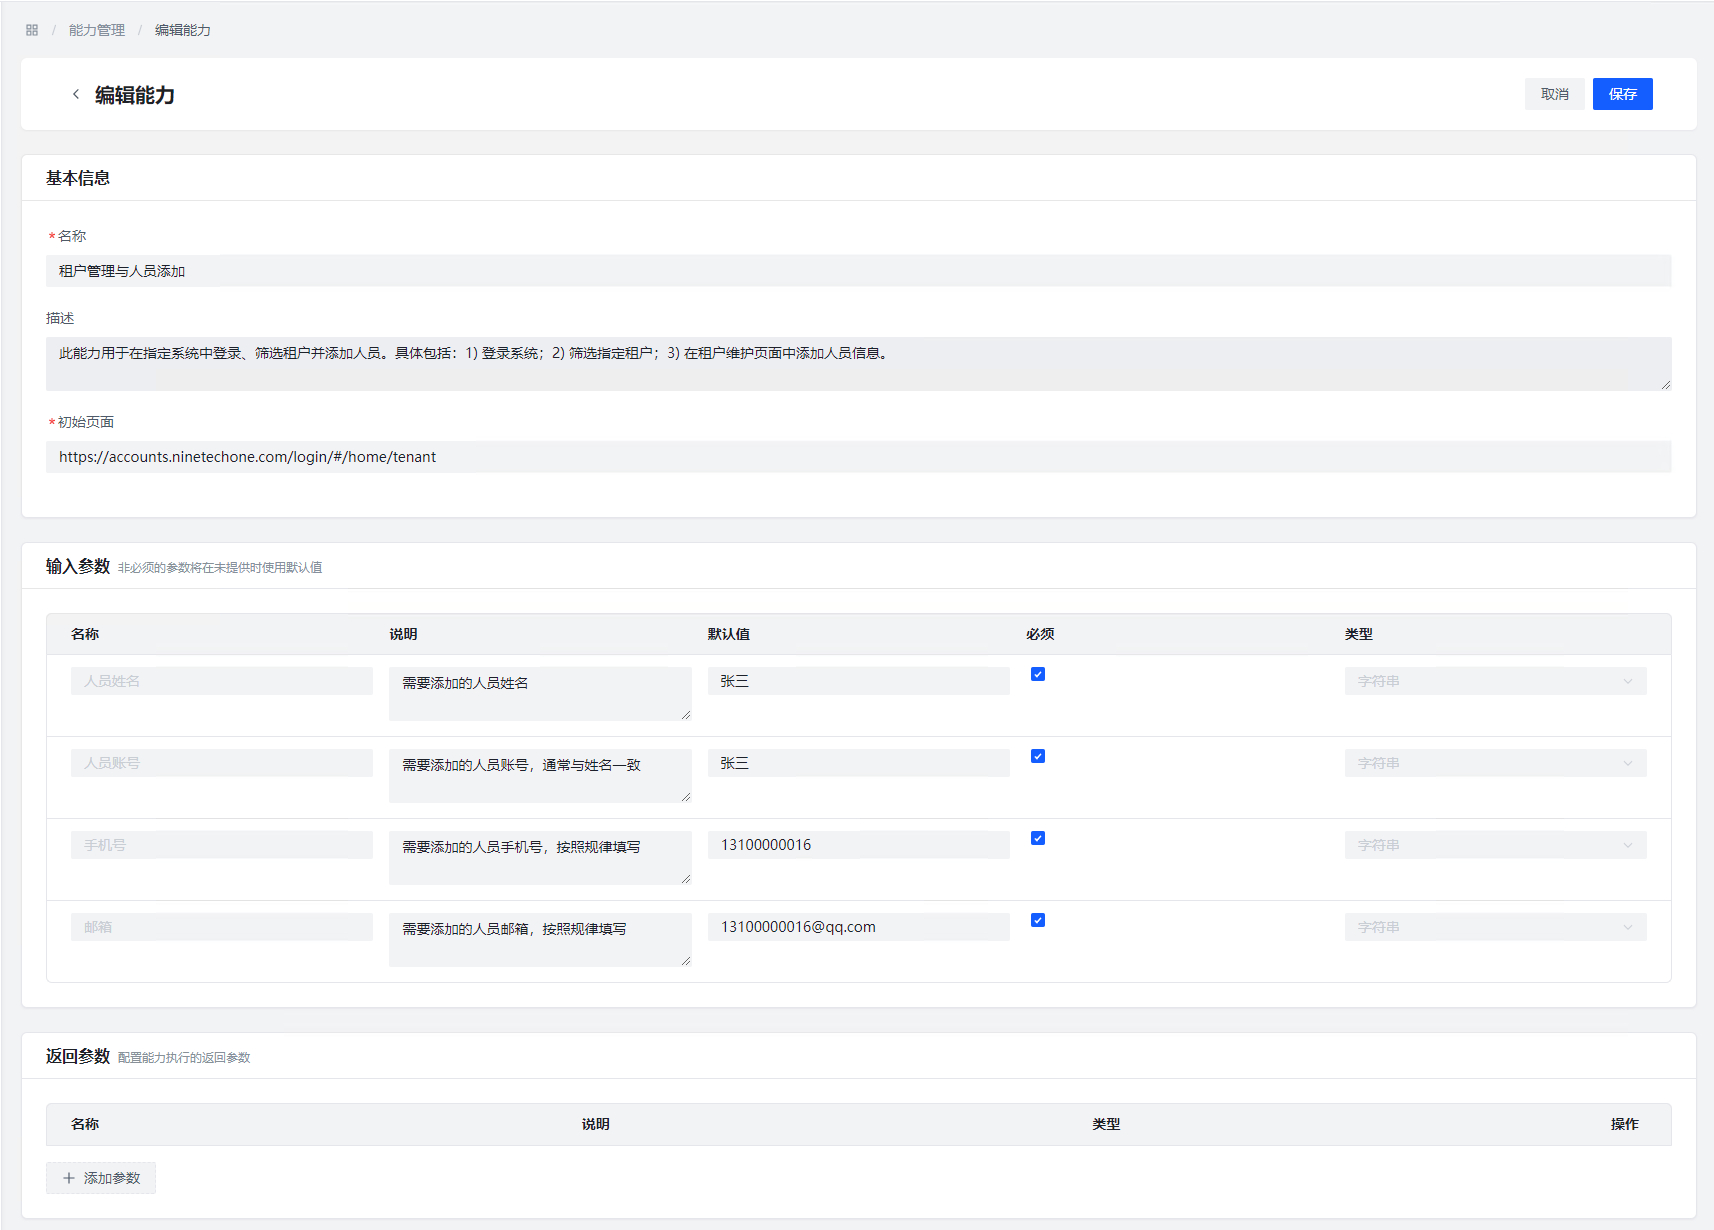
Basic Information
- Name: the capability name shown to users
- Description: a detailed description used as a reference when the model decides whether to call it in general mode
Input Parameters
Input parameters are the values required when the workflow runs.
- Name: identifies different parameters; not editable
- Description: passed to the model as the parameter description in general mode so it can call the capability accurately
- Default value: initially taken from the value used during exploration and can be changed later. It does not take effect when the parameter is marked
Required. - Required: if enabled, the parameter must be provided. In general mode, the system asks the user for the value. When creating a task manually, it is also required. If disabled, the default value is used whenever the user does not provide one.
Output Parameters
Output parameters are added back into the conversation in general mode so the Agent can judge the result of capability execution.
Outputs currently come from:
Generate File, which creates HTML, DOCX, or XLSX filesGenerate PPT, which creates PPTX filesGenerate Data, which creates simple typed outputs such as strings, numbers, integers, or booleans
Execution Configuration
These are default execution parameters for the capability. They are used by default in general mode and are also prefilled when creating a task, although they can be changed at task-creation time.
Run in Incognito Mode
When enabled, the capability runs in the privacy browser to avoid interference from existing login state. Enabled by default.
Skip Failed Steps
When enabled, a failed step is skipped automatically and the workflow continues. This is commonly used to bypass unstable login-state steps. Disabled by default.
In most situations, later steps depend on earlier ones. If a step fails, later steps may no longer work correctly.
When this option is enabled, the final task status is always reported as success. Use it carefully.
Close the Page After Execution
When enabled, the browser is closed automatically after the capability finishes. Enabled by default.
Only Available on Specific Pages

This means the capability is only loaded on specific pages.
You can use the * wildcard to replace variable parts of the scope, such as IDs, so the capability still works on the right pages.
After enabling this option:
- During exploration, the capability is only loaded when the browser is currently on a matching page. This does not affect calls from other capabilities.
- The first
Open Pagestep is skipped by default
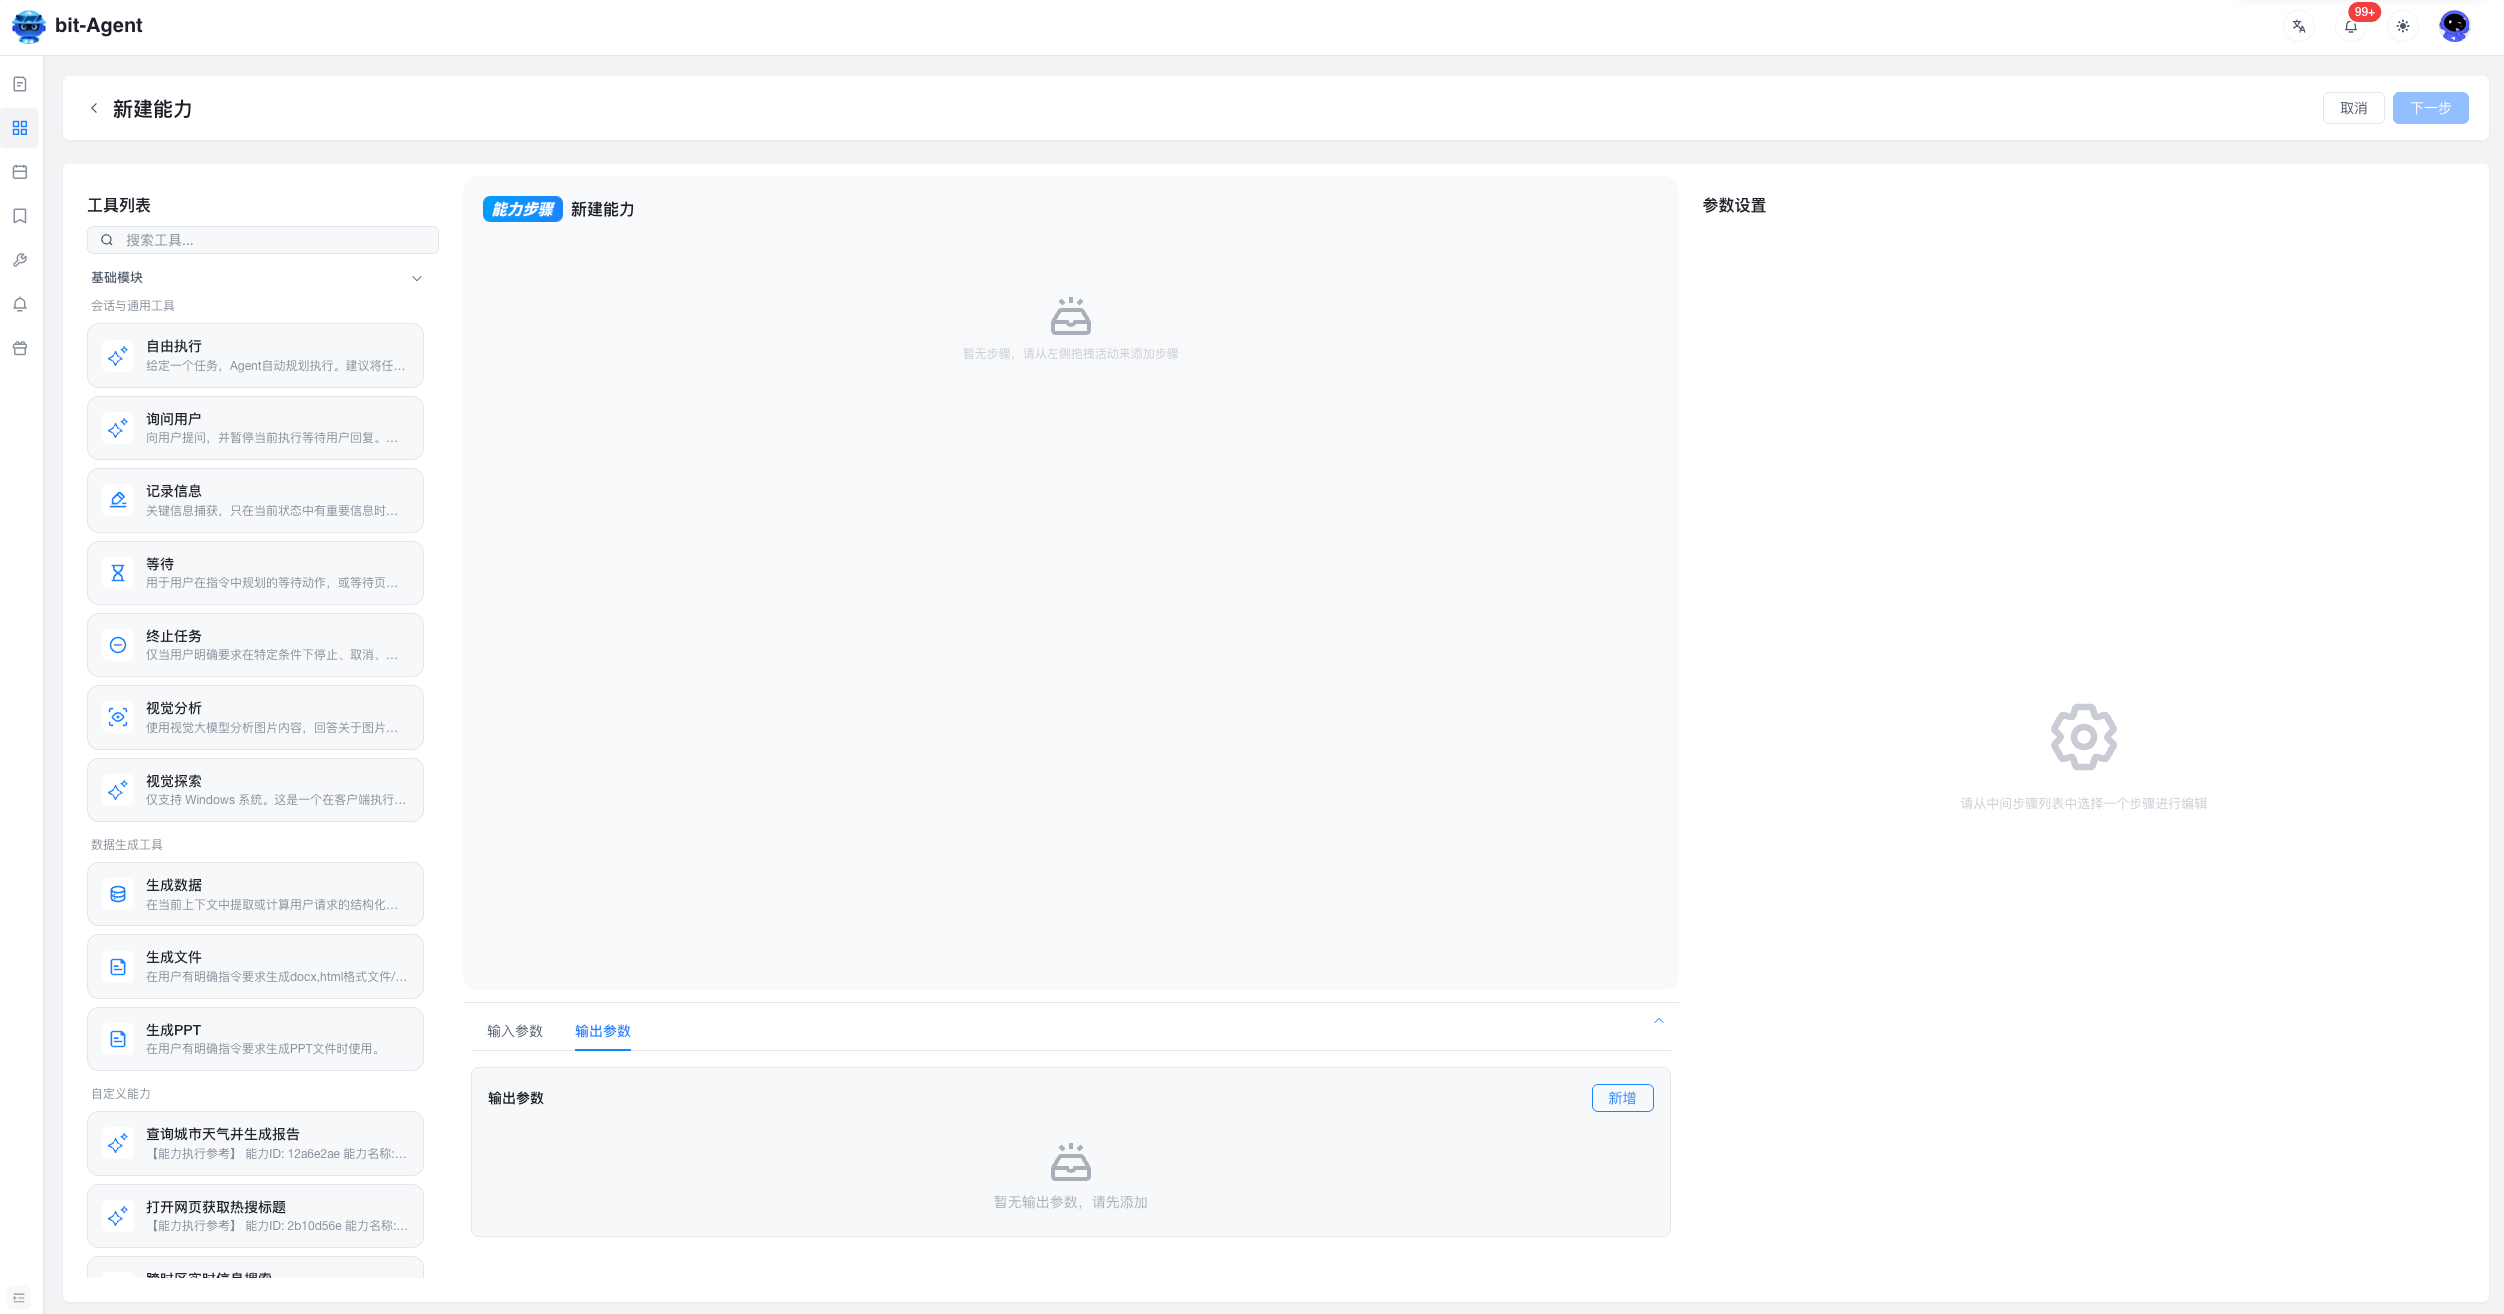
Edit Capability Steps
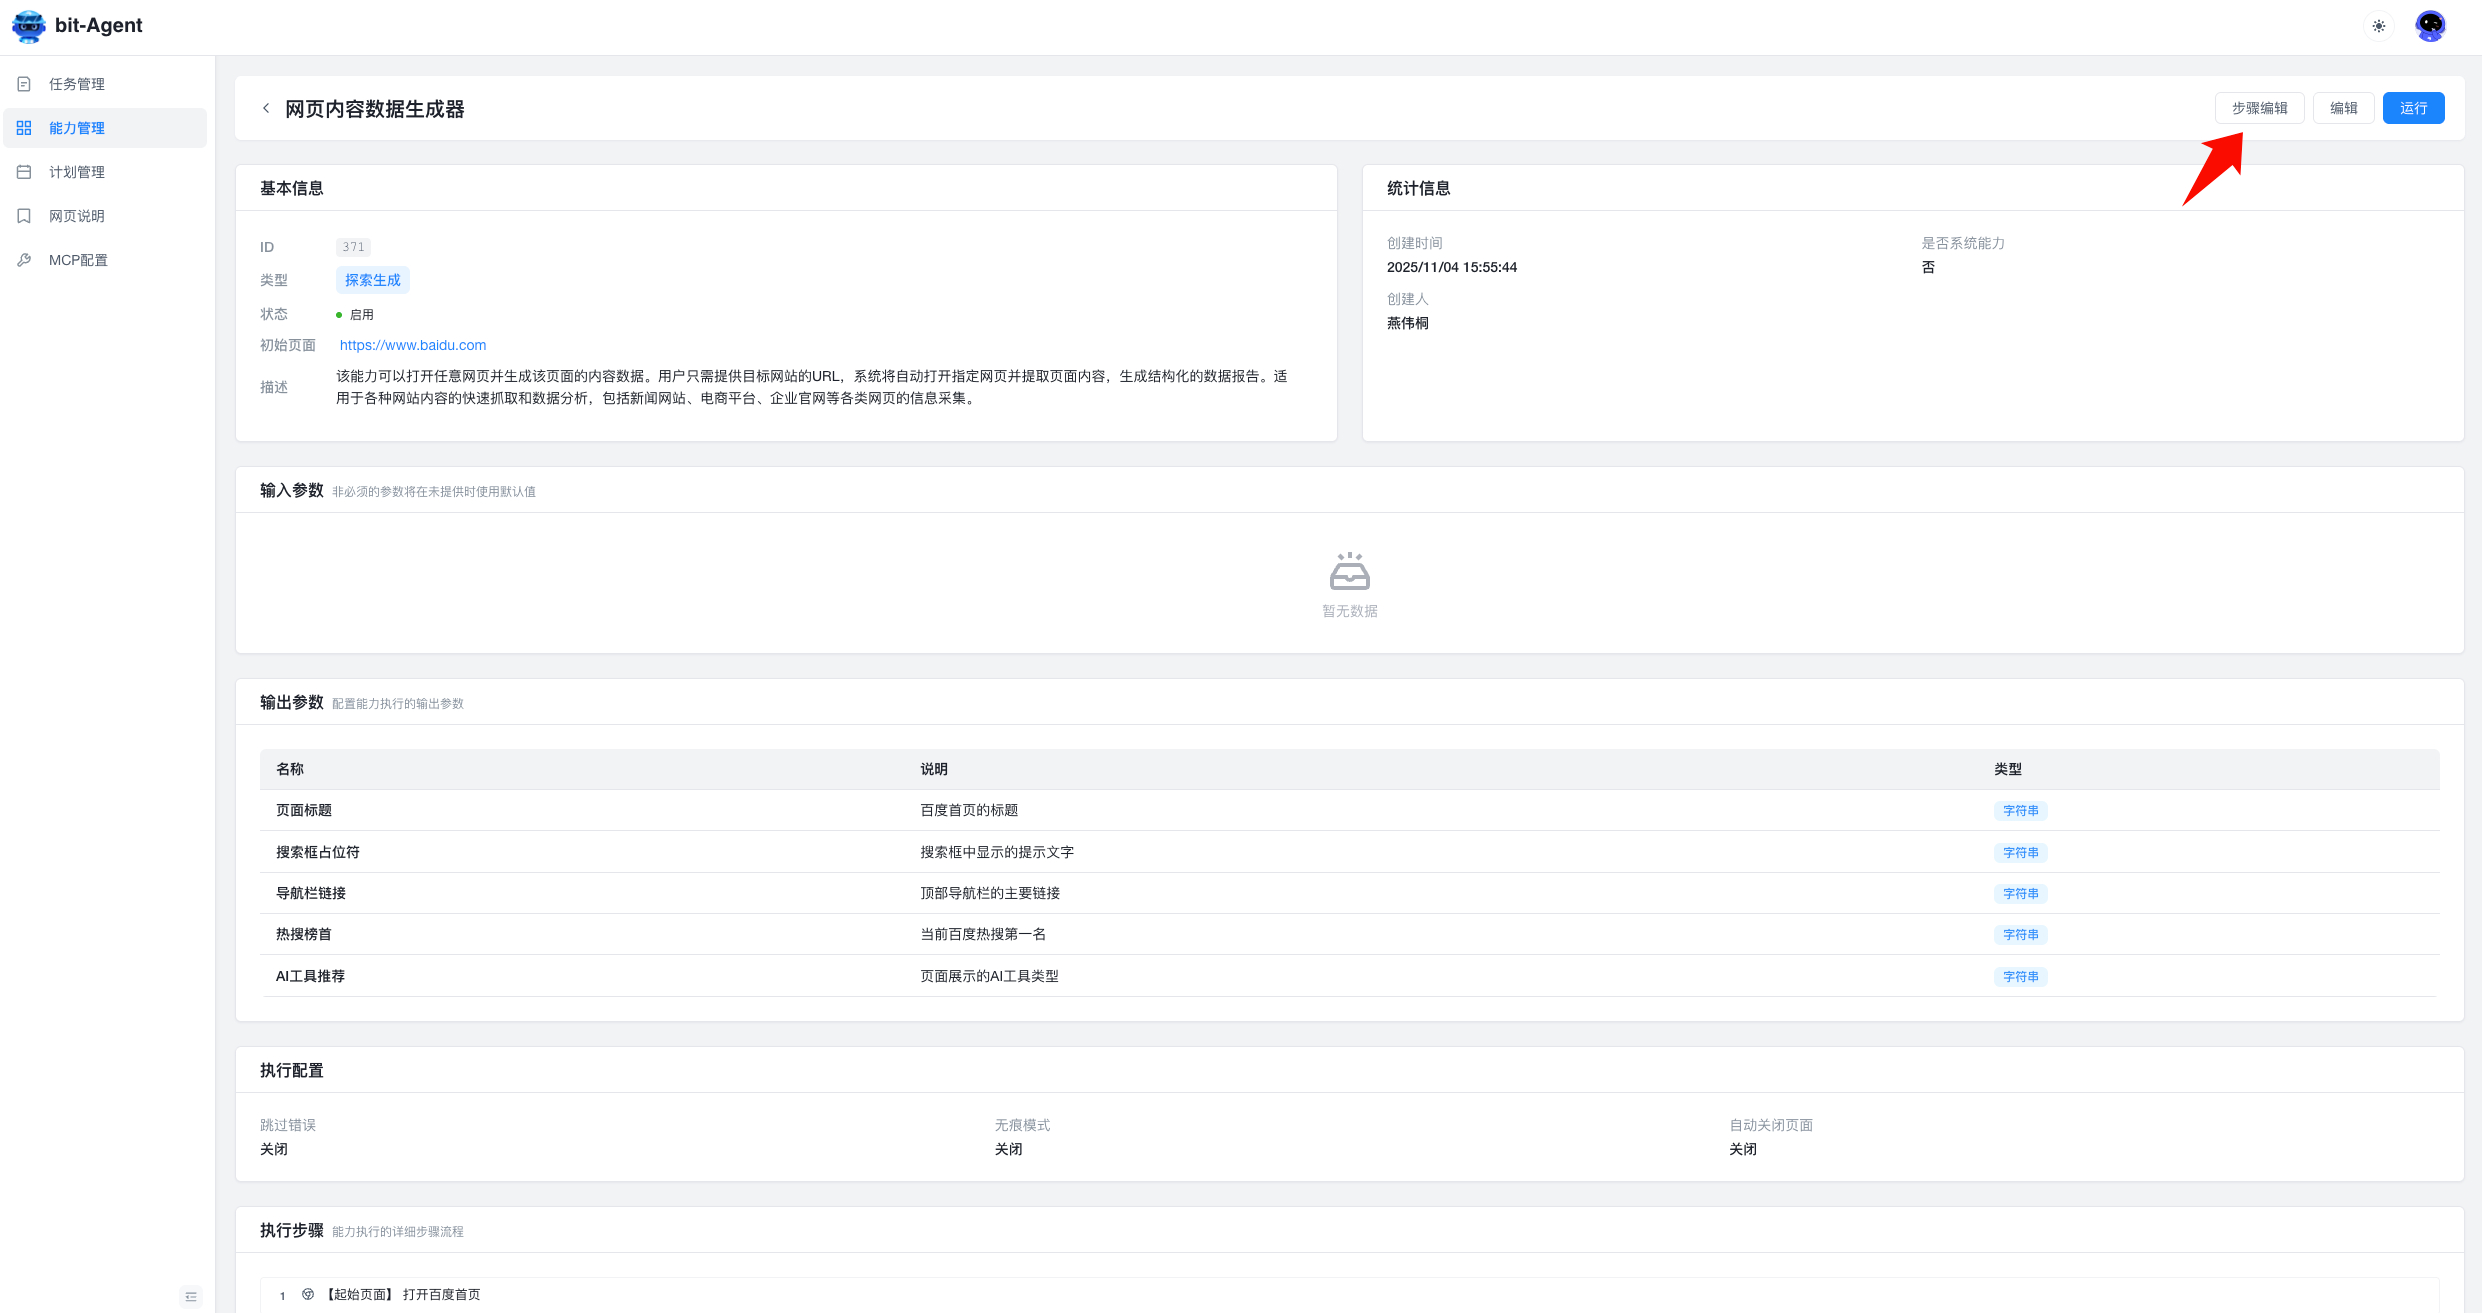
You can adjust capability steps from the capability detail page using the Step Editing button in the upper-right corner.
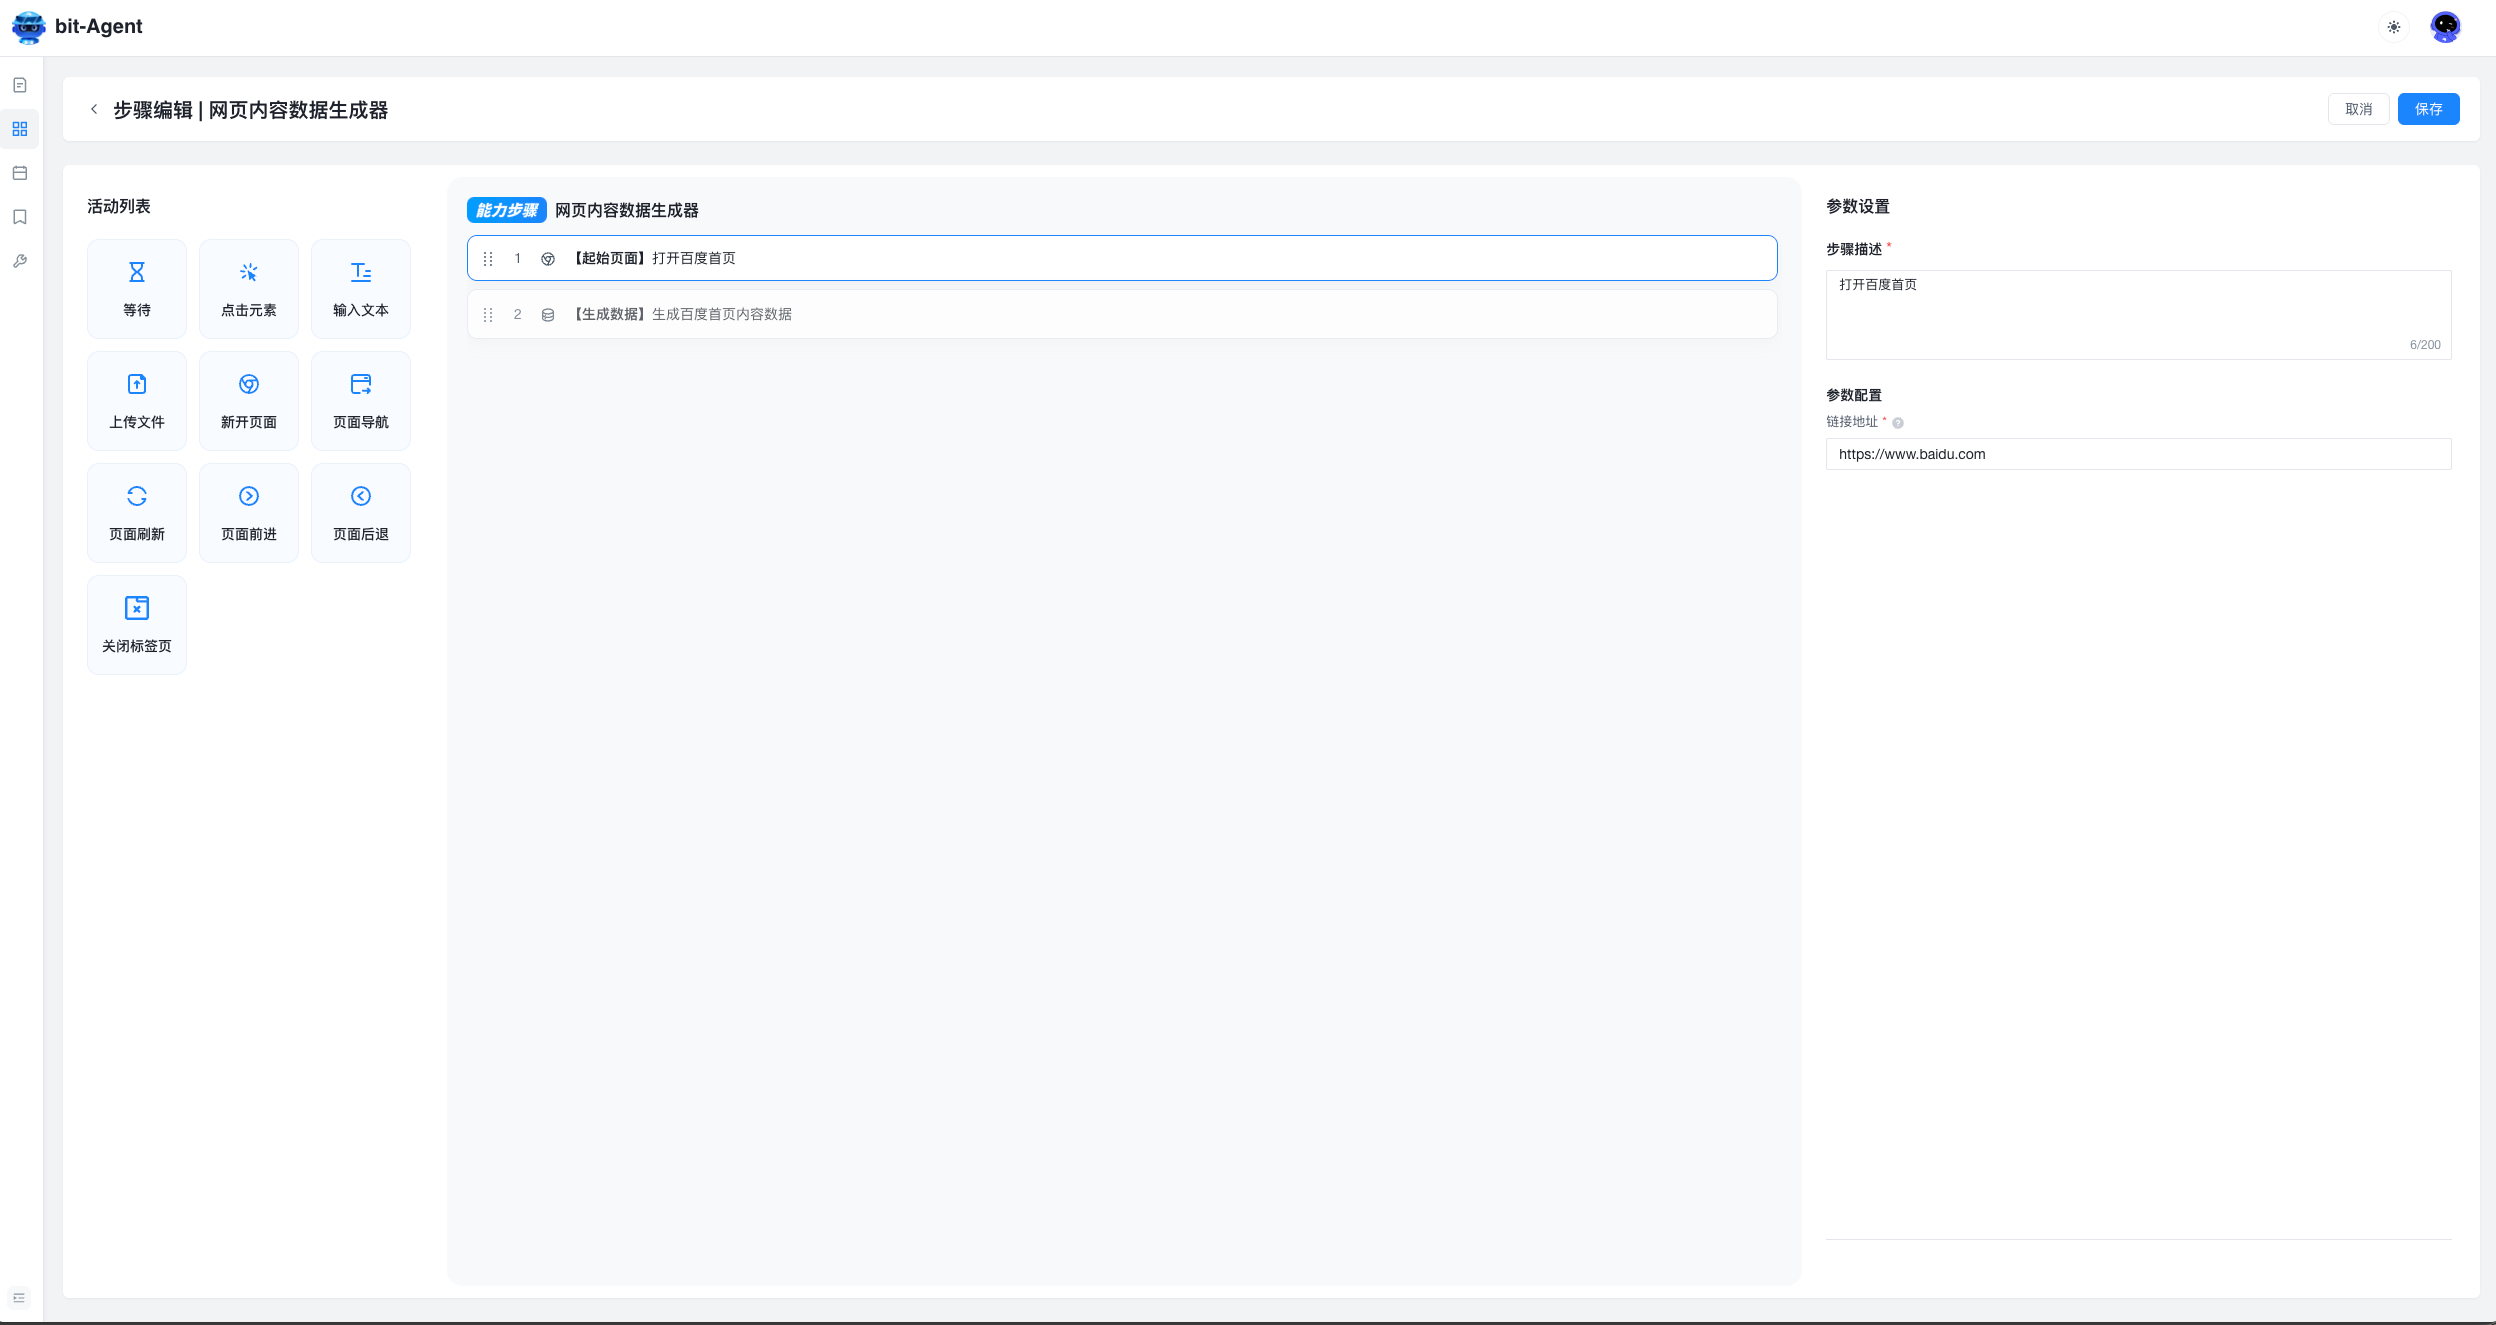
Available actions appear in the activity list on the left. At the moment, only activities listed there can be edited. You can drag tools from the left panel to add new steps.
Step Description
Every step must have a description.
This is not just a comment. During AI repair, the system uses the description to replan the step. If you add a step manually, it is strongly recommended that you rewrite the description carefully.
Element Wait Timeout
This field appears on tools that operate on elements.
It controls how many seconds the system waits for the element to appear. For example, if it is set to 10 seconds, the step executes immediately as soon as the element appears within that time. If the element still has not appeared after 10 seconds, the step fails.
Step Delay
This is the delay after a step executes, used for general waiting.
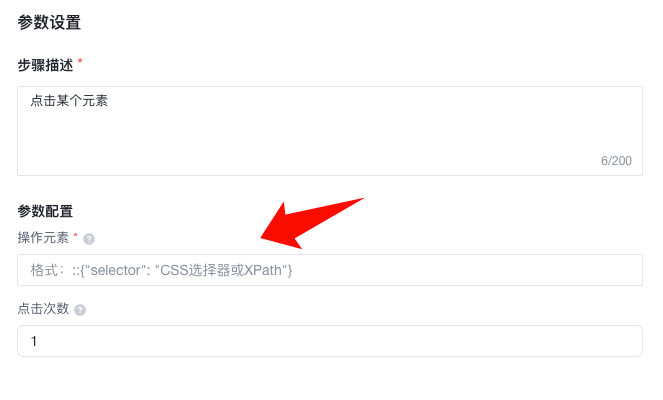
Select an Element
Actions such as click or input require an operation element. You can obtain the corresponding selector through the built-in plugin.
In bit-Agent V2.7 and later, this plugin is built in:
- Click once to enter element selection mode (press
ESCto exit) - Move the pointer over the element you want and make sure the red box wraps the correct target
- Click once to confirm, and the selector is copied to your clipboard
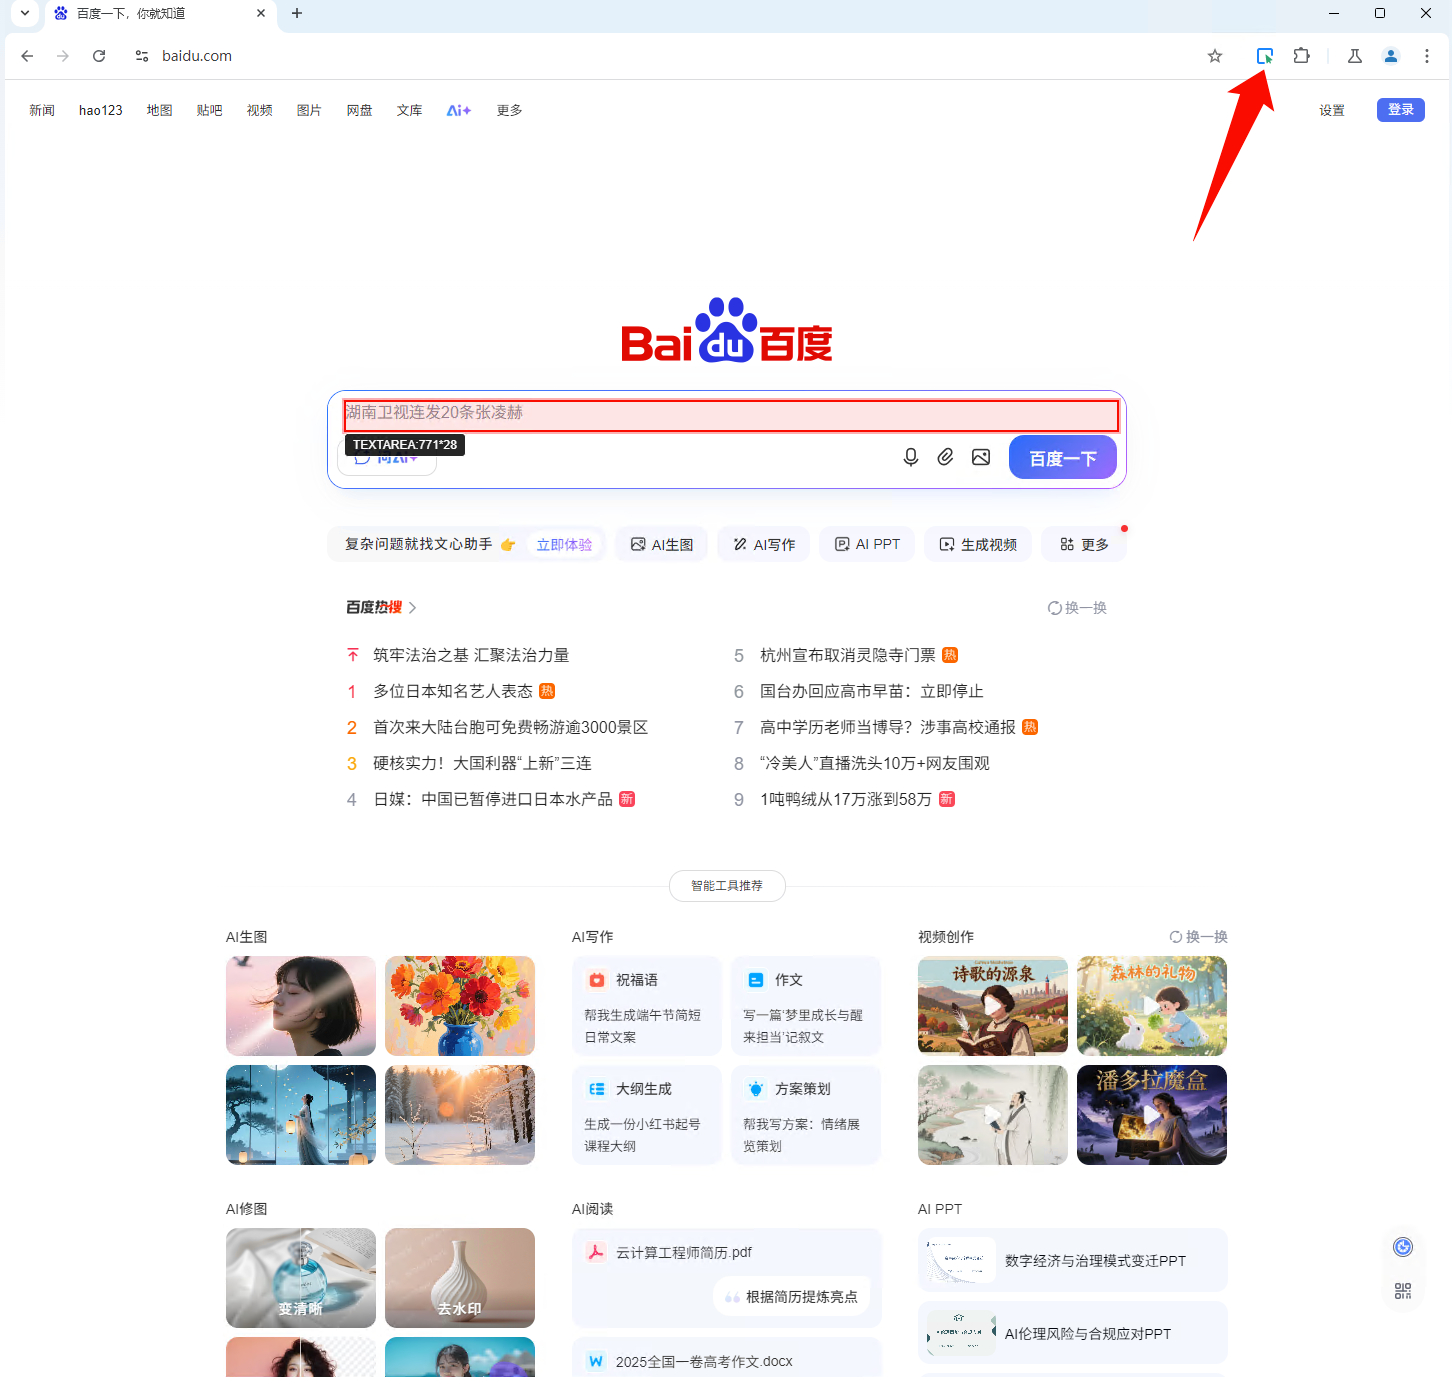
- Paste it into the
Operation Elementinput field
Define Input Parameters
Custom input parameters are reusable pieces of content that you define yourself.
After adding them, they can be reused across different steps instead of being typed repeatedly.
For example, you can define things like:
- keywords
- company name
- website URL
- product name
- city name
Then later steps can insert those values directly.
When to Use Them
Custom input parameters are useful when:
- the same content is reused across multiple steps
- you want to organize values that users may need to provide
- you want to change a value in one place and have all references update together
Where to Find Them
In the capability creation page or step editor, there is a section below the step list called Custom Input Parameters.
There you can:
- add parameters
- edit parameters
- delete parameters
- set default values
- set whether they are required
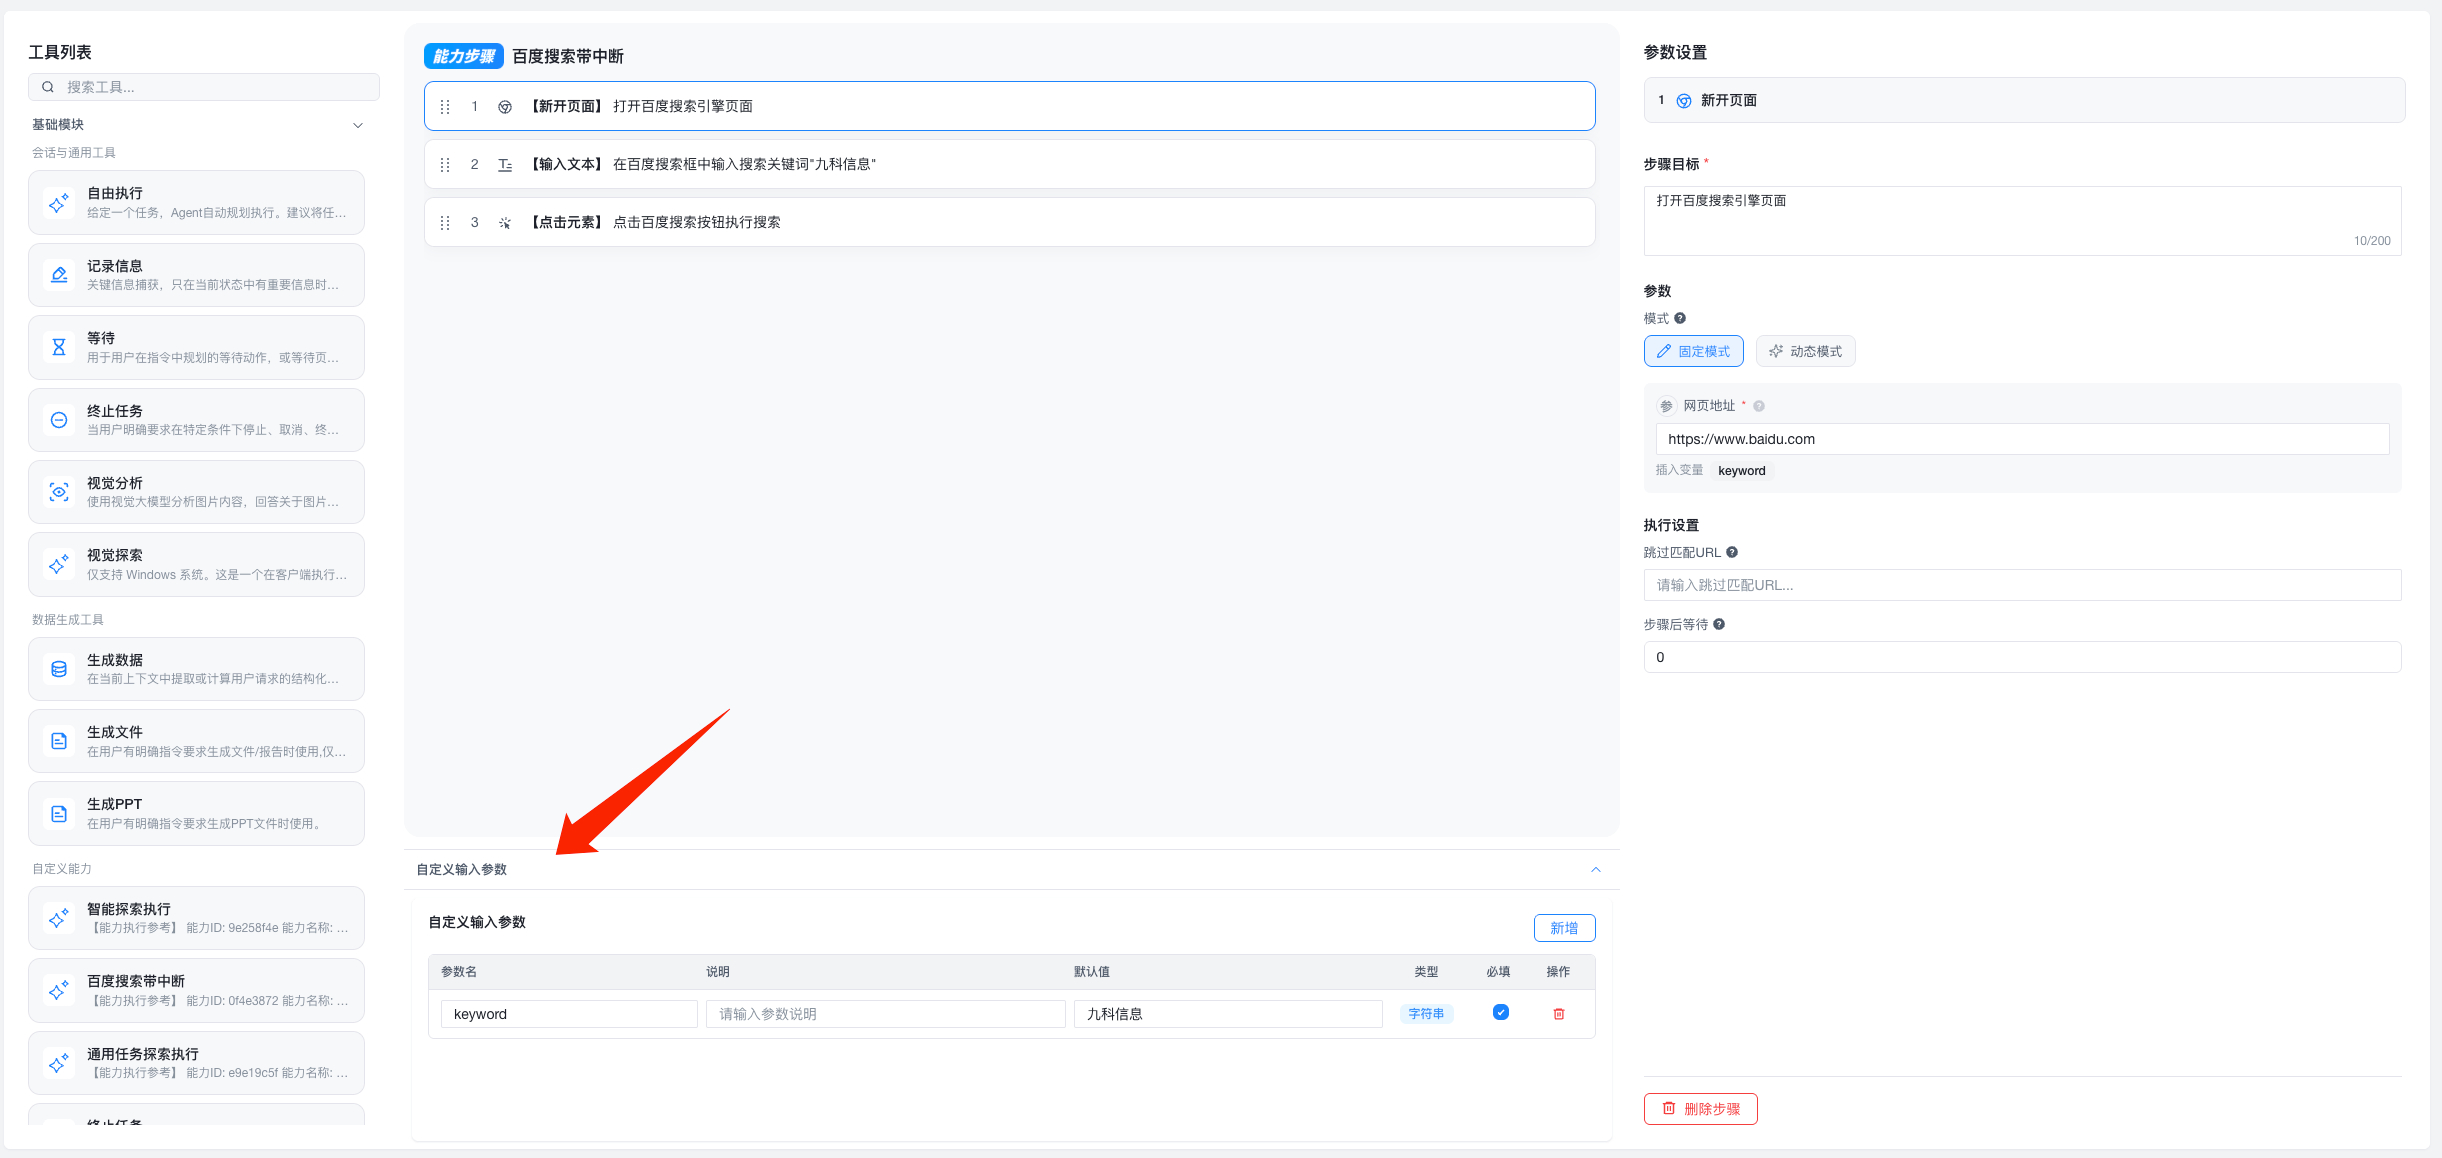
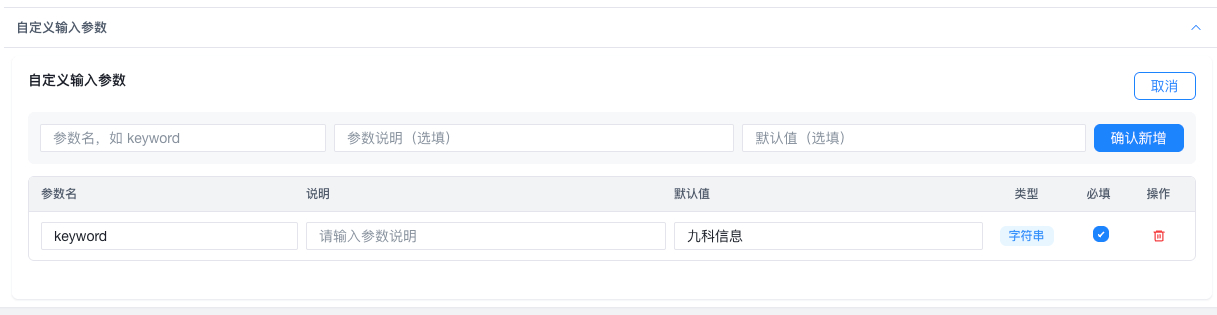
Add a Custom Input Parameter
In the Custom Input Parameters section, click Add.
Use a Parameter Inside a Step
Once created, the parameter can be used anywhere text input is supported, such as:
- a text field inside a step
- a code field inside a step
- a description field inside a step
In those places, if you see Insert Variable, click the parameter you want. The system inserts it at the current cursor position, or appends it to the end if no cursor position is active.

Modify a Parameter
You can edit directly in the parameter list:
- parameter name
- description
- default value
- whether it is required
Changes take effect immediately.
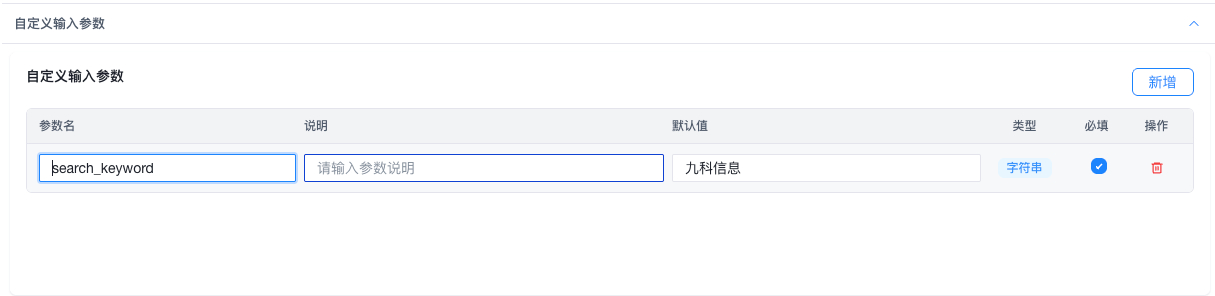
If you rename a parameter, the system automatically updates every place in steps where that parameter has already been used.
For example:
- original name:
keyword - new name:
search_keyword
Then all references to keyword in existing steps are updated automatically.

Delete a Parameter
Click the delete button in the operation column to remove it.
Before deleting, confirm:
- whether the parameter is still used in some steps
- whether it still needs to be reused later
If a deleted parameter is still referenced, related steps may need to be reviewed manually.
Recommendations
For maintainability:
- keep parameter names short and clear
- make descriptions explicit
- use custom input parameters for content reused across multiple steps
- use default values for content that is usually stable
Notes
- parameter names must be unique
- check whether a parameter is still in use before deleting it
- if one piece of content is used repeatedly across multiple steps, prefer making it a custom input parameter
Define Output Parameters
After a capability finishes running, the system organizes the final result into a structured output based on the output requirements you define.
You can think of it like this:
- input parameters tell the capability what to do
- execution steps tell the capability how to do it
- output parameters tell the capability what final result it must deliver
Output parameters are essentially a structured result definition backed by JSON Schema.
In the UI, however, you do not need to write code manually. You can configure fields visually, like assembling building blocks.
Why Configure Output Parameters
Without output parameters, the capability can still run, but the final result may:
- be unstable
- be hard for other tasks or systems to reuse
- return in a different format each time
- be difficult to process, display, or store automatically
After output parameters are defined, the capability organizes the final result according to your specification once all steps are complete.
This is especially useful when you want to:
- extract key information from a webpage
- generate a summary in a fixed format
- return a reusable set of data fields
- provide standardized input for later workflows
A Simple Example
Suppose you create a webpage summary capability and want it to return:
- a title
- a summary
- whether the content is recommended
Then the output parameters can be understood like this:
title: a string for the titlesummary: a string for the summaryrecommended: a boolean for whether the content is recommended
After execution, the capability may return something like this:
{
  "title": "OpenAI releases new capabilities",
  "summary": "This article introduces how the new capabilities work and the scenarios they fit.",
  "recommended": true
}
Configure Output Parameters
In the Output Parameters tab inside the capability definition area, you can add fields manually.
Each field usually needs these settings:
- field name: the actual key in the returned result, such as
summary - type: the data type of the field, such as text, number, boolean, object, or array
- required: whether this field must be returned
- description: an explanation of what the field should contain
Prioritize clear field names and descriptions, because they directly affect the quality of the final output.
How to Choose Field Types
The page supports these standard types:
-
stringGood for text such as titles, summaries, links, names, or addresses -
numberGood for decimals or general numeric values, such as a rating of4.5 -
integerGood for whole numbers, such as a quantity of3 -
booleanGood for yes/no or true/false values, such astrueorfalse -
objectGood for a group of related subfields -
arrayGood for list data
When to Use object
Use object when a field needs to be broken down into nested subfields.
For example, author information could contain:
- name
- job title
- company
Example:
{
  "author": {
    "name": "Jane Doe",
    "title": "Product Manager",
    "company": "Example Corp"
  }
}
When to Use array
Use array when a field returns multiple items of the same kind.
For example, a keywords list:
{
  "keywords": ["AI", "automation", "workflow"]
}
If every item in the list has multiple fields, set the item type to object.
For example, a products list:
{
  "products": [
    {
      "name": "Headphones",
      "price": 299
    },
    {
      "name": "Keyboard",
      "price": 499
    }
  ]
}
How to Name Fields
It is best to follow these principles:
- keep names short and clear
- make the meaning obvious
- let one field express one idea only
- keep the naming style consistent within the same output
Recommended examples:
titlesummarypriceisRecommendedauthorName
Avoid names like:
data1result_value_finalabc
If the output will be consumed by technical systems or APIs, English field names are recommended.
If it is only for internal trial use, you can start with names that are easy for your team to understand, but keep them consistent.
How to Write Descriptions
The description is not a casual note. It is a precise instruction about what the field should contain.
A good description should:
- explain the field content
- be as specific as possible
- avoid vague wording
For example:
-
summaryRecommended description:A final summary generated from all execution results, limited to 100 words. -
recommendedRecommended description:Whether the content should be recommended based on its quality. Return true or false. -
priceRecommended description:The current selling price of the product, in RMB.
The clearer the description is, the easier it is for the capability to return what you expect.
Notes
- Do not create too many fields
Too many fields bring two problems:
- higher configuration cost
- lower output stability
If some fields are not needed every time, it is better to leave them out at first.
- Prefer flat structures over excessive nesting
Deep nesting makes the result harder to inspect and reuse.
Use object or array + object only when there is a real grouping relationship.
- Decide who will use the result first
Before defining the output, ask yourself:
- is this result for people to read, or for systems to consume?
- will later workflows reference it?
- which fields must always exist reliably?
A clearer usage scenario leads to a more reasonable output structure.
Extract Fixed Values into Parameters
During step editing, you can convert fixed values into parameters so the capability becomes a reusable template.
How to Extract a Parameter
- Click the step you want to parameterize
- Find the field to turn into a parameter, such as
Text Content - Enable the
Parameterbutton beside the field - The field becomes an input parameter
After step editing is complete, click Next. The system automatically opens the parameter configuration page, where you can:
- change parameter names
- edit parameter descriptions
- set default values
- mark parameters as required
Default values do not take effect for required parameters. They are requested every time.
Typical Use Cases
After extracting fixed values into parameters, the capability can:
- be used by different people with different values each time
- be called intelligently by AI in general mode
- be shared with the team as a reusable template capability
For a detailed example, see Turn a Capability into a Template.
Parameter Notes
Required
If a parameter is marked required, it must be provided when using the capability.
Default Value
If a parameter is not required, you can set a default value. When no explicit value is provided, the system uses that default.
Recommendations:
- set defaults for values that are often fixed
- mark values as required if they change frequently
Dynamic Steps and Loop Mode
Dynamic Steps
When a step parameter should be determined dynamically from the current context, use the Generate at Runtime option:
- Enable
Generate at Runtimefor the field during step editing - Write a dynamic prompt that explains how the value should be generated
- At execution time, AI generates the parameter based on the current context and that prompt
Dynamic steps vs extracted parameters:
| Scenario | Recommended approach |
|---|---|
| The user should provide a fixed value ahead of time | Extract as a parameter |
| The value should depend on page content or current context | Dynamic step |
Loop Mode
For steps that need to repeat, such as batch-processing list items, you can enable loop mode:
- Select the step to repeat
- Enable
Loop Mode - Set the parameter source to
Dynamic Step - Write a dynamic prompt so AI decides:
- how many times to run
- what the parameters are each time
- when the loop should stop
Typical use cases:
- processing every item in a list
- repeatedly calling a child capability for multiple objects
- deciding the number of repetitions dynamically based on page content
Conditional Invocation

Capability calls now support conditional invocation. You can write the condition in natural language, and the model decides whether the step should run.
Call Other Capabilities
Inside a capability, you can call other capabilities to build reusable compositions.
How to Call a Child Capability
- Find the
Call Capabilityactivity in the activity list - Drag it into the step flow
- Select the capability to call
- Configure its input parameters:
- using fixed values
- by extracting them as parameters of the current capability
- by generating them dynamically at runtime
Best Practices for Capability Composition
Design principles:
- Single responsibility: each child capability should do one clear thing
- Reusability: make child capabilities reusable through parameterization
- Page scoping: child capabilities should usually enable
Only available on specific pagesto avoid accidental triggering
Typical pattern:
Capability A (child capability): process one object
  -> configure input parameters
  -> enable "Only available on specific pages"

Capability B (parent capability): batch scheduling
  -> open the list page
  -> loop over Capability A
  -> summarize the result
This approach gives you:
- decomposable and maintainable engineering workflows
- independently testable child capabilities
- long-running and stable automation pipelines
See Advanced: Composing Capabilities for a full example.
Call Free Execution
Free Execution is a flexible capability type that plans steps autonomously from your prompt. Depending on the tools you allow, you can even think of different Free Execution steps as different sub-agents.
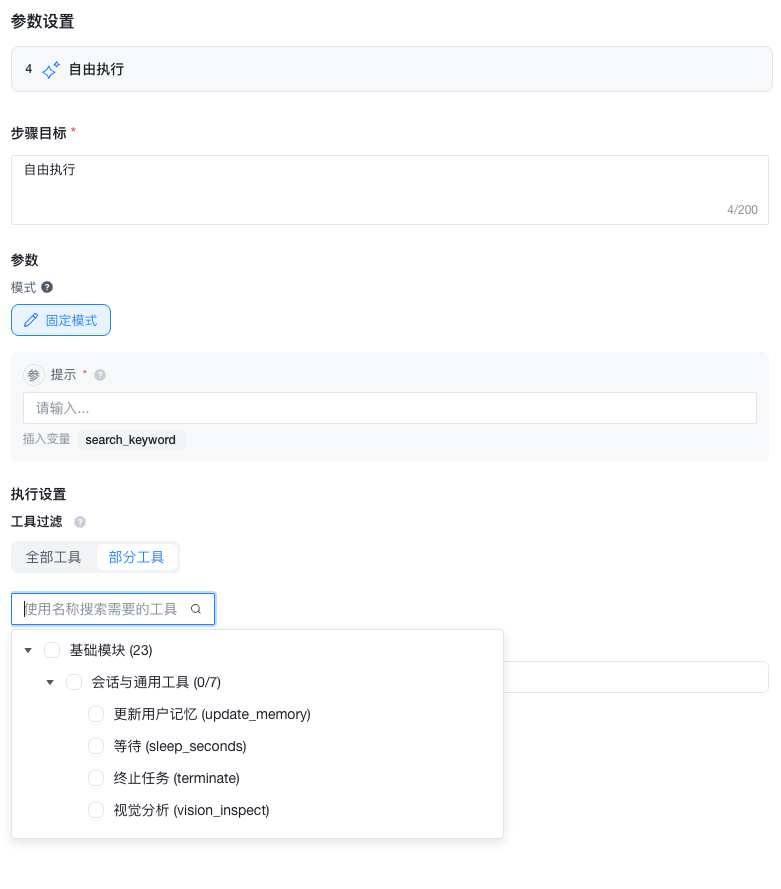
Tool Filtering for Free Execution
When a step uses Free Execution, you can define the scope of tools available to that step.
This can be understood as:
All Tools: the step uses the system's default tool rules with no extra restrictionsSelected Tools: the step can only use the tools you explicitly check
This is helpful when you want a step to do only one category of work. It improves control and also makes debugging easier.
After entering the capability edit page or step editor, find a step that uses Free Execution.
In that step's execution settings, you will see the Tool Filter configuration.
How to Configure It
If you choose All Tools, the step does not limit tools separately and continues using the system default rules.
This is suitable when:
- you do not want fine-grained tool control yet
- you want to keep behavior consistent with earlier versions
If you choose Selected Tools, a tree selector appears.
The tree is organized as:
- tool group
- tool module
- specific tool
You can select:
- an entire group
- a module
- an individual tool
Parent and child selections are linked, which makes large selections faster.
Import and Export Capabilities
Capabilities can be shared by exporting them to a file. Multiple capabilities can be exported together.
During import, only a single file can be selected at a time, but that file may contain multiple capabilities.
Export Capabilities
- Open the capability list and select the capabilities to share
- Click
Exportand the system generates a capability file - Send that file to teammates or another environment
Import Capabilities
- Click
Importin the capability management page - Select the capability file you received
- After import, check the capability list to confirm all content is present
Notes
- Do not edit capability files manually, or the import may fail
- After import, test them on a small scale first to confirm parameters and target web environments still match
Execute a Capability
Executing a capability means creating a task using the current capability. See Task Management for details.